

This post will help you to install and compile nginx 1.14 on Ubuntu 18.04 LTS server. We always recommend to our readers that whenever you use any ubuntu server always go for latest LTS edition.
When you install nginx by compiling from source package, it gives you one major benefit and that is adding extra module after installation. When you install by using package manager tool like yum,apt, dnf etc., you will get blocker when you need to install additional module in nginx. Yes! package manager provides easy control on package and it is faster too.
Disclaimer: We are installing Nginx on DigitalOcean droplet(server)
Install and compile Nginx 1.14
Follow the given below steps to install Nginx from source package on Ubuntu 18.04 LTS .
Login as root/super user
Login to server as root. In case, you are login as non-root user then you have to switch to super user (It need sudeors access).
To become super user from non-root user, here is the command.
sudo su
You can either use sudo with all command which you run and requires super user access.
Create Nginx system user
Run the given below command for creating new nginx system user. This user will be used for installing the nginx.
sudo useradd -s /sbin/nologin nginx
Install dependency packages
Install all the dependencies. These all packages are listed because we will add related modules. In other words you can also say that these dependencies are related to some Nginx module.
sudo apt update
sudo apt install gcc libpcre3-dev zlib1g-dev libssl-dev libxml2-dev libxslt1-dev  libgd-dev google-perftools libgoogle-perftools-dev libperl-dev
Download and install nginx 1.14
In this section, we will read how to install and compile nginx 1.14 .
Always remember that with every new nginx release some changes are introduced and hence it might also reflect on list of modules which will be added during compilation.
Download Nginx Source package
Always download and install stable and latest nginx source release. This is case with all types o package in all Operating system. It keeps your system less vulnerable to any attack/malicious activity.
At the time of writing this post, the Nginx stable version is 1.14. Hence we are downloading the same.
curl -O http://nginx.org/download/nginx-1.14.0.tar.gz
Decompress the downloaded Nginx source package
When you download the nginx stable release package,it has extension of tar.gz . It means it is compress tar ball file and need to decompress first. In other technical term you can say untar the package.
sudo tar -xvzf nginx-1.14.0.tar.gz
Compiling/Installing from Nginx source files
After decompress the package tar ball, the directory called ‘nginx-1.14.0’ will be extracted out. Now change directory to nginx-1.14.0 and start compiling the source files.
cd nginx-1.14.0
Start compiling.
sudo ./configure --user=nginx --group=nginx --sbin-path=/usr/sbin/nginx --conf-path=/etc/nginx/nginx.conf --with-select_module --with-poll_module --with-threads --with-file-aio --with-http_ssl_module --with-http_v2_module --with-http_realip_module --with-http_addition_module --with-http_xslt_module --with-http_xslt_module=dynamic --with-http_image_filter_module --with-http_image_filter_module=dynamic --with-http_geoip_module --with-http_geoip_module=dynamic --with-http_sub_module --with-http_dav_module --with-http_flv_module --with-http_mp4_module --with-http_gunzip_module --with-http_gzip_static_module --with-http_auth_request_module --with-http_random_index_module --with-http_secure_link_module --with-http_degradation_module --with-http_slice_module --with-http_stub_status_module --with-http_perl_module --with-http_perl_module=dynamic --with-mail --with-mail=dynamic --with-mail_ssl_module --with-stream --with-stream=dynamic --with-stream_ssl_module --with-stream_realip_module --with-stream_geoip_module --with-stream_geoip_module=dynamic --with-stream_ssl_preread_module --with-google_perftools_module --with-cpp_test_module --with-compat --with-pcre --with-pcre-jit --with-zlib-asm=CPU --with-libatomic --with-debug --with-ld-opt="-Wl,-E"
Make and install.
sudo make && sudo make install
The installation is completed and you will get the ‘Configuration summary’ like this at trailing end of output.
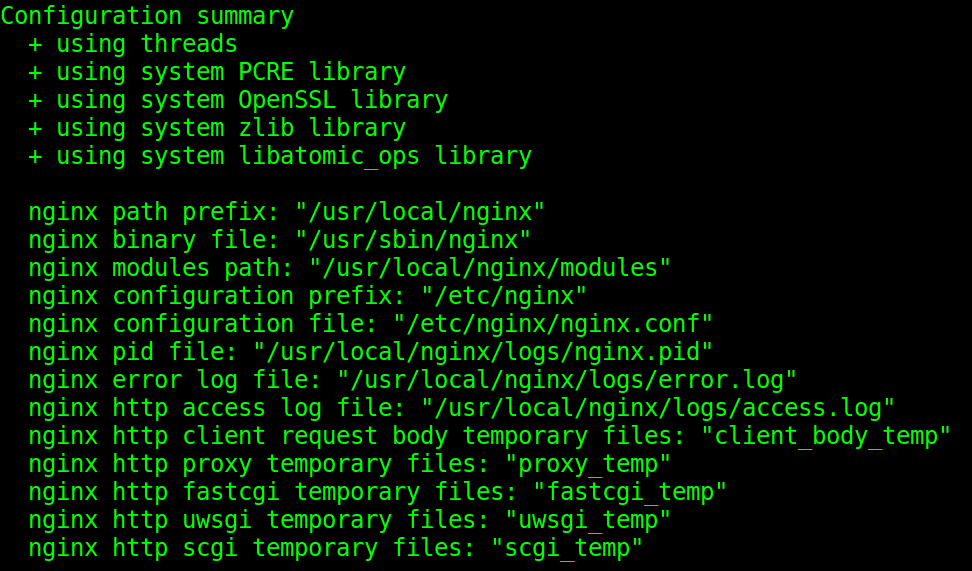
Configuration summary output (These are not commands)
Create systemd service script file for nginx
To start,stop,restart and checking status of nginx service you can create systemd service script.
Use your favourite file editor, our is vi/vim .
sudo vi /lib/systemd/system/nginx.service
Write/paste the given below contents in file /lib/systemd/system/nginx.service . Save and exit from file editor.
[Unit]
Description=The Nginx 1.14 service
After=syslog.target network.target remote-fs.target nss-lookup.target

[Service]
Type=forking
PIDFile=/usr/local/nginx/logs/nginx.pid
ExecStartPre=/usr/sbin/nginx -t
ExecStart=/usr/sbin/nginx
ExecReload=/usr/sbin/nginx -s reload
ExecStop=/bin/kill -s QUIT $MAINPID
PrivateTmp=true

[Install]
WantedBy=multi-user.target
After creating the nginx service file, you should reload the systemd manager configuration.
sudo systemctl daemon-reload
To start nginx service
sudo systemctl start nginx.service
To stop nginx service
sudo systemctl stop nginx.service
To restart nginx service
sudo systemctl restart nginx.service
To check status of nginx service
sudo systemctl status nginx.service
To enable nginx service to run at booting time
sudo systemctl enable nginx.service
To disable nginx service, not to run at booting time
sudo systemctl disable nginx.service
Check and confirm Nginx defualt port and webpage
Start the nginx service as given in above section. Then follow the given below steps.
(A) Check default listening port (port number 80 or http)
Run given below command to check nginx default listening port.ss -tanlp|grep 80
Output: You can see port number 80 listening for ALL and nginx pid number also.
root@sharadchhetri:~# ss -tanlp|grep 80
LISTEN   0         128                 0.0.0.0:80               0.0.0.0:*        users:(("nginx",pid=1511,fd=6),("nginx",pid=1507,fd=6))
root@sharadchhetri:~#
(B) Check default Nginx web page
From your laptop/Desktop , open the web browser eg.Google Chrome or Firefox . Type the ip address of Nginx server in web browser’s URL field.
Note:To get the ip address of your system , use the command ip addr list

Why we install dependencies package before compiling nginx source code
This section is for additional good read. There are reasons why we have installed particular dependencies packages. So we are sharing the information about the dependency package name and its related error during nginx compilation.
## Package to install: gcc
./configure: error: C compiler cc is not found

## Package to install: lipcre3-dev
./configure: error: the HTTP rewrite module requires the PCRE library.
You can either disable the module by using --without-http_rewrite_module
option, or install the PCRE library into the system, or build the PCRE library
statically from the source with nginx by using --with-pcre= option.


## Package to install: zlib1g-dev
./configure: error: the HTTP gzip module requires the zlib library.
You can either disable the module by using --without-http_gzip_module
option, or install the zlib library into the system, or build the zlib library
statically from the source with nginx by using --with-zlib= option.


## Package to install: libxml2-dev, libxslt1-dev
./configure: error: the HTTP XSLT module requires the libxml2/libxslt
libraries. You can either do not enable the module or install the libraries


## Package to install: libgd-dev
./configure: error: the HTTP image filter module requires the GD library.
You can either do not enable the module or install the libraries.


## Package to install: libgeoip1 libgeoip-dev
./configure: error: the GeoIP module requires the GeoIP library.
You can either do not enable the module or install the library.

## Package to install: google-perftools, libgoogle-perftools-dev
./configure: error: the Google perftools module requires the Google perftools
library. You can either do not enable the module or install the library.

## Package to install: libatomic-ops-dev
./configure: error: libatomic_ops library was not found.

## Package to install: libperl-dev
/usr/bin/x86_64-linux-gnu-ld: cannot find -lperl
collect2: error: ld returned 1 exit status
objs/Makefile:1607: recipe for target 'objs/ngx_http_perl_module.so' failed
make[1]: *** [objs/ngx_http_perl_module.so] Error 1
make[1]: Leaving directory '/root/nginx-1.14.0'
Makefile:8: recipe for target 'build' failed
make: *** [build] Error 2


Hi, i follow the step as you show and on the last step when I run the sudo make install and keeping getting the following error message, may I know what I did wrong? or how to solve the following error?
Thanks
make -f objs/Makefile
make[1]: Entering directory ‘/home/ubuntu/nginx-dev/nginx-1.14.0’
make[1]: Nothing to be done for ‘build’.
make[1]: Leaving directory ‘/home/ubuntu/nginx-dev/nginx-1.14.0’
make -f objs/Makefile install
make[1]: Entering directory ‘/home/ubuntu/nginx-dev/nginx-1.14.0’
test -d ‘/usr/local/nginx’ || mkdir -p ‘/usr/local/nginx’
test -d ‘/usr/local/nginx’ \
|| mkdir -p ‘/usr/local/nginx’
test ! -f ‘/usr/local/nginx/nginx’ \
|| mv ‘/usr/local/nginx/nginx’ \
‘/usr/local/nginx/nginx.old’
cp objs/nginx ‘/usr/local/nginx/nginx’
test -d ‘/usr/local/nginx’ \
|| mkdir -p ‘/usr/local/nginx’
cp conf/koi-win ‘/usr/local/nginx’
cp conf/koi-utf ‘/usr/local/nginx’
cp conf/win-utf ‘/usr/local/nginx’
test -f ‘/usr/local/nginx/mime.types’ \
|| cp conf/mime.types ‘/usr/local/nginx’
cp conf/mime.types ‘/usr/local/nginx/mime.types.default’
test -f ‘/usr/local/nginx/fastcgi_params’ \
|| cp conf/fastcgi_params ‘/usr/local/nginx’
cp conf/fastcgi_params \
‘/usr/local/nginx/fastcgi_params.default’
test -f ‘/usr/local/nginx/fastcgi.conf’ \
|| cp conf/fastcgi.conf ‘/usr/local/nginx’
cp conf/fastcgi.conf ‘/usr/local/nginx/fastcgi.conf.default’
test -f ‘/usr/local/nginx/uwsgi_params’ \
|| cp conf/uwsgi_params ‘/usr/local/nginx’
cp conf/uwsgi_params \
‘/usr/local/nginx/uwsgi_params.default’
test -f ‘/usr/local/nginx/scgi_params’ \
|| cp conf/scgi_params ‘/usr/local/nginx’
cp conf/scgi_params \
‘/usr/local/nginx/scgi_params.default’
test -f ‘/usr/local/nginx/nginx.conf’ \
|| cp conf/nginx.conf ‘/usr/local/nginx/nginx.conf’
cp conf/nginx.conf ‘/usr/local/nginx/nginx.conf.default’
test -d ‘/usr/local/nginx’ \
|| mkdir -p ‘/usr/local/nginx’
test -d ‘/usr/local/nginx/logs’ \
|| mkdir -p ‘/usr/local/nginx/logs’
test -d ‘/usr/local/nginx/html’ \
|| cp -R html ‘/usr/local/nginx’
test -d ‘/usr/local/nginx/logs’ \
|| mkdir -p ‘/usr/local/nginx/logs’
make[1]: Leaving directory ‘/home/ubuntu/nginx-dev/nginx-1.14.0’
Hi,
Most probably you may have not run ‘make’ command before ‘make install’ .
I would suggest to check the logs once for clear information.
Regards
Sharad