

In this tutorial we will learn,how to install Owncloud 6 in Ubuntu 13.10 Server.Recently, the Owncloud community has released its new verison called Owncloud 6. Owncloud is one the best alternative for Dropbox and Google Drive. You can self host the Owncloud very quickly in short span of time.You can access,share and sync the data from owncloud from computers and mobile devices.
Detail of Server in which practical is done
Operating System: Ubuntu 13.10 Server editon
Operating System Architecture: x86_64
IP Address: 192.168.56.102
To install Owncloud 6 in Ubuntu 13.10,follow the given below steps
Step 1: Become a superuser
Login into Ubuntu System.Open the terminal and become a superuser by typing given below password
sudo su -
Step 2: Add Owncloud repository information in Apt source list file
Run the below command to add Owncloud repo URL in Apt source list file
apt-get install -y wget

sh -c "echo 'deb http://download.opensuse.org/repositories/isv:/ownCloud:/community/xUbuntu_13.10/ /' >> /etc/apt/sources.list.d/owncloud.list"

wget http://download.opensuse.org/repositories/isv:ownCloud:community/xUbuntu_13.10/Release.key

apt-key add - < Release.key

apt-get update
Step 3: Install Web Server,Database Server,Owncloud package and PHP 5
Run the below given command to install apache,mysql-server,owncloud and php version 5. While installation it will ask to give new password for MySQL root user.Hence give new MySQL root password while installation.
apt-get install owncloud apache2 mysql-server php5 php5-mysql
Step 4: Edit the apache2.conf file
First take the backup of apache2.conf file,
cp -p /etc/apache2/apache2.conf /etc/apache2/apache2.conf.orig
Now edit the apache2.conf, find the line <Directory /var/www> .Now replace AllowOverride None to AllowOverride All as given below.
Note: I have edited with vim editor,use your favorite editor
vim /etc/apache2/apache2.confOptions Indexes FollowSymLinks AllowOverride All Require all granted
Step 5: Edit the owncloud.conf file
First we will take backup of owncloud.conf file. Clear all the contents from /etc/apache2/conf.d/owncloud.conf and paste below given content.
cp -p /etc/apache2/conf.d/owncloud.conf /etc/apache2/conf.d/owncloud.conf.orig
vim /etc/apache2/conf.d/owncloud.confOptions Indexes FollowSymLinks MultiViews AllowOverride All Require all granted
Step 6: Enable rewrite module in apache
Enable rewrite module in apache and restart the apache service
a2enmod rewrite

/etc/init.d/apache2 restart
Step 7: Create Database and user for owncloud in MySQL server
We will create database called owncloud and mysql user called ownclouduser.Now login into mysql server.Create mysql user and database plus grant privileges to user on the database.
First restart the mysql (If mysql server is running then not require)
/etc/init.d/mysql restart
mysql -u root -p

After login you will get the mysql prompt like this
mysql >

Now create a user and set the password. Use strong password

mysql> CREATE USER 'ownclouduser'@'localhost' IDENTIFIED BY 'Password';

create database called owncloud

mysql> create database owncloud;

Grant privileges to owncloud user in owncloud database

mysql> GRANT ALL ON owncloud.* TO 'ownclouduser'@'localhost';

mysql> flush privileges;

mysql> exit
Step 8: Install Owncloud from Web interface
Open the browser and type http://IP-address-Of-Server/owncloud .Fill all the information field as asked in Webinterface
User Name : Give Admin user name
Password : Give Admin user's password
Click on Advanced button
Data Folder: It will be selected by-default
In "configure the database" section,click on MySQL and fill
MySQL user : ownclouduser
Password : Give mysql ownclouduser password
Database Name : owncloud
Database Host: localhost

Now it takes a few seconds to complete and suddenly you will get next screen opened like this

Now the installation is completed.Now you can start uploading,downloading,sharing the data in owncloud. With Admin user you can create user and install useful apps. Explore owncloud,it is awesome
Further Reading : Setup Owncloud 6 with Self Signed SSL Certificate in Ubuntu 13.10


и еще один вопрос какие порты использует сервер owncloud для нормальной работы?
Owncloud using web server.Hence default port for Web Services is port 80 and 443.
Mysql use the default port 3306 .
OwnCloud помощью веб server.Hence порт по умолчанию для веб-служб является порт 80 и 443.
Mysql использовать порт 3306 по умолчанию.
добрый день у меня есть вопрос как настроить отправку ссылок по почте?
You have to set mail configuration in file owncloud/config/config.php .
The owncloud use PHPmailer script.
Вы должны установить конфигурацию почты в файле OwnCloud / конфигурации / config.php.
OwnCloud использование PHPMailer сценарий.
добрый день sharad как можно помочь вашему сайту ?
Thankyou Evgeniy,
Your words after translating into English
I am glad to know,you wants to help our website. For help, you can donate any amount of money to any charity organisation of any location. Or donate any amount of money to any open source project. Instead of money donation, you can also donate anything like cloth,books,useful objects to needful people.
After donation,kindly inform me at admin@sharadchhetri.com .
I will always looking for your suggestion and critics to improve our website. Any suggestion,technical tips etc. are always welcome.
Translating into Russian language
Regards
Sharad
Извините Шарад я в всем разобрался все работает спасибо большое за отличный пост !!!
after translation,
Thankyou Evgeniy,keep reading our blog
(Спасибо Евгений, продолжайте читать наш блог)
Hey tell me how to configure it would be possible to upload large files was in owncloud???
Hello Evgeniy,
The option is available in Owncloud dashboard.
You also have to edit php.ini file. Read this post
You can also read this post
hello thanks for the quick response sharad
But I can not help your post. My version (owncloud 6.0.2) and it otlechaetsya location (/ etc / owncloud / htaccess) and I can not find this fayl.Ne could you tell where to make inquiring (owncloud 6.0.2)
PS thanks in advance
Hello Evgeniy,
Apologise, I am not able to understand your question.
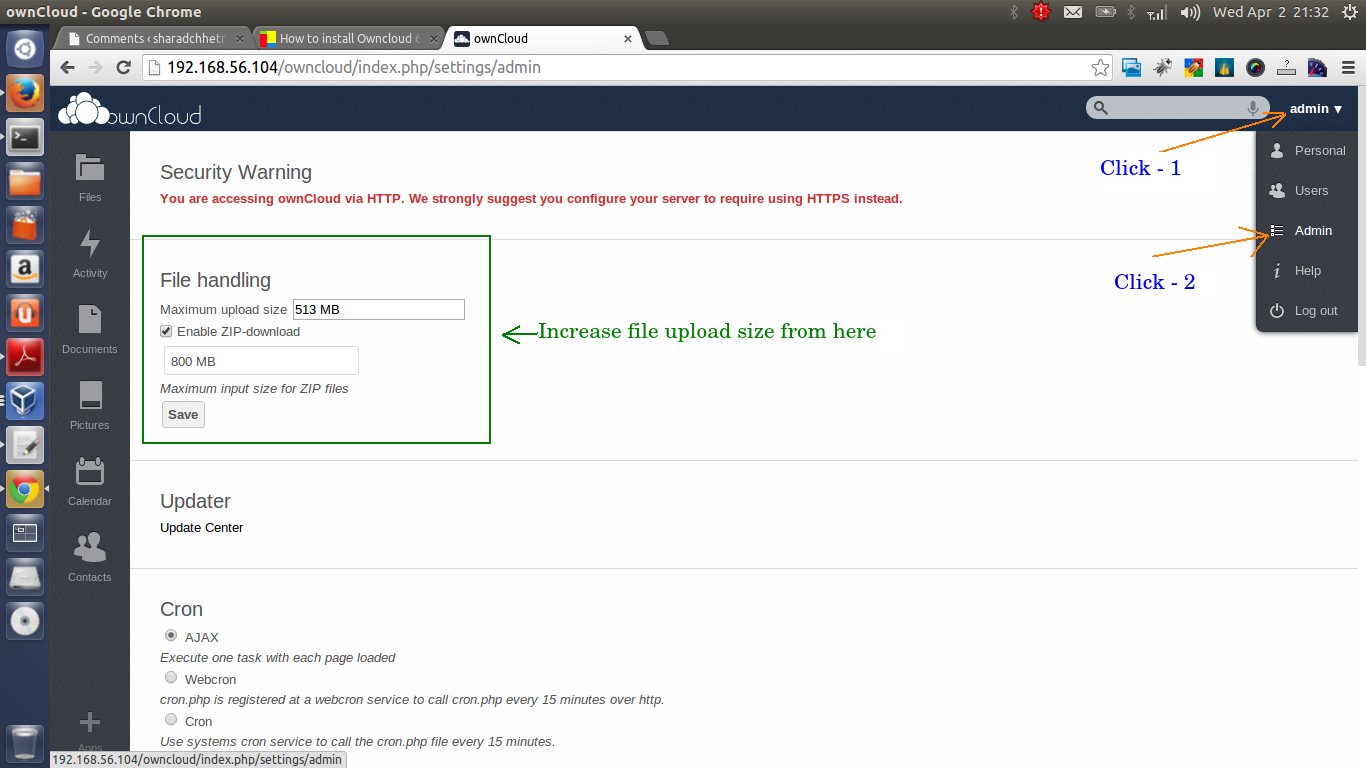
I assume, you are looking for setting in owncloud dashboard to increase upload limit.Below is the screenshot of settings from owncloud dashboard
Edit /etc/php5/apache2/php.ini . and change the value of given below parameter.
After saving the php.ini file. Now restart the apache2 service
Note: Language is not a barrier, you can write in your country language to describe your question.I generally use google translate.
спасибо большое я разобрался c файлами, я нашел файл Htaccess..
Есть другой вопрос можно разделить owncloud на две части ? а именно mysql на одном сервере под управлением windows 2012, а сам owncloud и apache , php на ubuntu 13.10 . Если можно то не могли бы подсказать как это сделать ?
after translation,
yes , you can run mysql in other server. In step 8,use the ip address of your mysql server instead of localhost.
Make your remote database server accessable from owncloud server.
It will work
If I would like to change the home folder for all owncloud users to a specific drive is it enough to change owncloud.conf and apache2.conf directory from /var/www to /media/”drive”/ocdata ?
And to be clear I’m a complete beginner in linux so please be patient. Just newly started playing around with Ubuntu Server and so far it has been a lot of fun. I have been able to set up a few services successfully so far but due to my inexperience it has taken somewhat longer than I thought 🙂
Hello Rudrugis Nossranie,
Welcome in Linux World.I hope you are enjoying working on Linux OS.
In short,I would like to share some information on Owncloud and apache web server.
In owncloud,there is directory called data .Which is one the most important directory because it contains all user data inside.I expect from you to explore this directory and understand its tree.
Always remember, Apache web server run with its user called www-data(In Debina based OS like Ubuntu) and apache(it is username,in Red Hat based OS like CentOS/Scientific Linux)
I will recommend you to keep owncloud all files and directory in Apache Webserver default directory like /var/www (In Debian/Ubuntu) or /var/www/html (Red Hat/CentOS)
Now as per your question.You want to keep Owncloud data in /media/drive/ocdata
So here is the trick,
after installing owncloud. Unmount the owncloud data directory and mount point to /media/drive/ocdata
Before this I will suggest you to take backup of data directory.
Now unmount the ownlcoud data directory and mount point to /media/drive/ocdata/ . As I have done given below.
I will also rename original owncloud data directory. And create new directory with name data
After mounting,now copy all files into new data directory (Remember After mounting)
Run the command,
df -hto check mount point of /var/www/data/ .data directory should mount point to /media/drive/ocdata
Restart the apache web server .
Now Open owncloud and login. Upload any sample file .Now open the terminal and change to /var/www/data/USER-NAME/ .You will some 3-4 more directory. check in all directory, you should see sample file in any of these directory.
I used same logic in with NAS filesystem. NAS is like a remote storage.Just for a reference, read this Post (This post is for some experienced user)
Try the method,which I have given you. And also try to troubleshot yourself.Then only you can able to understand the OS.
Well, let me know the feedback and you can ask your question anytime in this blog.
Looking further for your response
Hi, thx for the awesomely quick response. I’m following you guide now.
I took a look at the data folder found in /var/www/owncloud/ directory as you suggested and think I know what you’re getting at.
Then I got in some trouble:
When I do umount I get the following message:
umount: /var/www/data: not mounted
which is from my inexperienced point of view a confirmation that the umount was successful but the again that might be an error too for all I know.
Then when I do the mount with “mount /media/”drive”/ocdata” I get this message:
mount: /media/”drive”/odata is not a block device”
which seems to be an error, right? and when I run df -h there is of course no mount for /var/www/data.
Did I screw things up?
At least it seems so for I’m not reaching the server any more in my browser.
Do I need to put things back the way they were and start again from scratch?
hopefully this is just some small newbie mistake 🙂
again thanks for your time and effort in assisting me with this 🙂
Hi, thx for the awesomely quick response.
I took a look at the folder structure in /var/www/owncloud as you suggested and think I get where you’re going with this.
I went and followed your guide above but ran into some trouble on the way which an inexperienced user like myself don’t understand.
I changed it a little for the “data” folder is located under owncloud dir to begin with.
Steps:
1. -> sudo su
2 -> cp -rvf /var/www/owncloud/data /root/owncloud-data-backup
3 -> mv /var/www/owncloud/data /var/www/owncloud/data.original
4 -> mkdir /var/www/data
5 -> umount /var/www/data
Message: umount: /var/www/data: not mounted
6 -> mount /media/”drive”/ocdata /var/www/data
Message: Mount: /media/”drive”/ocdata is not a block drive
df -h shows no mount for /media/”drive”/ocdata
I have no idea what’s going on here 🙂
Some google-ing returns the following: mount –bind
I’m a little hesitant to use this without at least trying to get a response first because I don’t want to mess things up beyond the point of no return 🙂
again thank you for your time and effort, this is greatly appreciated.
Hello Rudrugis,
It was my typo fault,shame on me.(I did typo with owncloud word).
2nd thing is also, when we rename data dir and after that we used command
umount data. The data dir name do not exit after rename.(this is another blunder,I wrote)As per default owncloud dir, we should take backup of – /var/www/owncloud/data
Restore back to old settings.
Hi again
I managed to sort things out, and got it working again with home folder for users in /media/drive/ocdata
I didn’t change anything just restarted the server for maintenance and voila it just worked with no mount for it. Don’t know why though 😀
Thank you very much for your help, now I’m going to take a look at ssl
nice, I hope you have checked all things in Server.
For SSL ,I have written a post . It is not updated post for Ubuntu 13.10,but only difference is Apache 2.4 version.In apache 2.4 ,it uses new term.
Thanks for the guide, it worked well. I now need to get https working under 13.10
Thankyou Chris,
Try this tutorial https://sharadchhetri.com/2013/05/24/how-to-configure-self-signed-ssl-certificate-in-owncloud-ubuntu/
Only difference is,in Ubuntu 13.10 , apache version 2.4.Might be some new terms we have to change. I will check this SSL setup in ubuntu 13.10 . Some of users has done that with this same tutorial.
Regards
Sharad
Hi! Did you get owncloud https working in Ubuntu 13.10?
I really need it and have tried everything but can’t get it to work.
Kind regards,
David.
Yes,I have done the practical on https with owncloud in Ubuntu 13.10.
I have not documented yet.Will write soon and will send you the email after completion
Hello David,
I have just documented the SSL Owncloud 6 in Ubuntu 13.10 Server. Here is the post
Let me know if any typo or you face any issue.
Very helpfull guide!!
A little typo in the MySQL setup
The line “GRANT ALL ON owncloud.* TO ‘owncloud’@’localhost’;” is not correct
The user should be ownclouduser as it is created just above.
Thanks Michael,
I really appreciate,you notified the typo.This is very helpful.
Thanks again for heads up.
Regards
Sharad
text is now unselectable
Thanks David,
For reporting the issue.It is because of page was not load properly.
I am optimizing the site now.I hope you have setup the owncloud now
sh -c ??
worked fine till last step then i got a garbled screen.
Apache log said htaccesstest.txt client denied by server configuration.
tried several times same error ?? I will look at it later.
Thanks David, in sh -c , there is typo of ” . The command will add the repo link of owncloudd url in apt-get list